แอพลิเคชันในปัจจุบัน โดยเฉพาะแอพลิเคชันบนอุปกรณ์พกพานั้น จำเป็นต้องอ่านและเขียนข้อมูลกับเซิฟเวอร์มากขึ้นด้วยหลายๆ เหตุผล เช่น เพื่อให้แอพลิเคชันแสดงข้อมูลข่าวสารล่าสุดได้ตลอดเวลา เพื่อให้ข้อมูลของผู้ใช้จัดเก็บบนกลุ่มเมฆ สามารถเรียกใช้ได้ไม่ว่าจากเครื่องใดๆ เป็นต้น นั่นหมายความว่า นอกจากนักพัฒนาจะต้องพัฒนาแอพลิเคชันสำหรับอุปกรณ์ต่างๆ แล้ว ยังต้องพัฒนาแอพลิเคชันสำหรับเซิฟเวอร์เพื่อติดต่อกับอุปกรณ์ รวมถึงต้องดูแลระบบให้พร้อมใช้งานอยู่เสมอ
ในตอนนี้เราจะแนะนำวิธีการใช้งาน Microsoft Azure Mobile Service ที่ช่วยให้เราสร้างระบบที่จำเป็นสำหรับการจัดเก็บข้อมูลออนไลน์ รวมถึงระบบ push notification ได้ง่าย รวดเร็ว และไม่ต้องกังวลเรื่องการดูแลระบบ หรือการรองรับผู้ใช้ปริมาณมากๆ อีกด้วย
โปรเจกต์ตัวอย่าง
ในตอนนี้เราจะนำหน้าตาแอพลิเคชันจากโปรเจกต์ StrifePad ของตอนก่อนๆ มาใช้ แต่ได้ตัดฟีเจอร์ในการอ่านเขียนไฟล์บนเครื่องออกทั้งหมด เพื่อให้ไม่สับสนกับโค้ดในตอนก่อนๆ โดยผู้อ่านสามารถดาวน์โหลดโปรเจกต์เริ่มต้น และโปรเจกต์ที่ทำเสร็จแล้วได้ที่นี่
การเตรียมตัวใช้งาน Windows Azure
ตอนนี้เราสามารถสมัครใช้งาน Windows Azure เพื่อทดลองใช้งานได้ฟรี 90 วัน (แบบจำกัดปริมาณการใช้งาน) โดยเราจะต้องระบุหมายเลขบัตรเครดิตสำหรับสมัครใช้งาน สามารถเข้าไปสมัครใช้งานได้ที่หน้าสมัครบริการทดลองใช้งาน
เมื่อสมัครเสร็จเรียบร้อยแล้ว เราจะสามารถจัดการทรัพยากรต่างๆ บน Windows Azure ได้ผ่านหน้า management portal (https://manage.windowsazure.com)
การสร้าง mobile service
เราจะใช้ mobile service ซึ่งเป็นบริการสำหรับจัดการกับข้อมูลจากอุปกรณ์ต่างๆ อย่างง่าย ในการเก็บไฟล์เอกสารสำหรับแอพลิเคชันตัวอย่างของเรา เริ่มต้นจากเปิดหน้า management Portal เลือกที่ mobile service จากเมนูด้านซ้าย แล้วคลิกปุ่ม create จากนั้นระบุ URL ของ mobile service และพื้นที่เปิด service ที่ต้องการ (ในที่นี้กำหนด URL เป็น strifepad.azure-mobile.net ซึ่งผู้อ่านจะไม่สามารถสร้าง URL นี้ซ้ำได้อีก)

จากนั้นระบุคุณสมบัติของฐานข้อมูลที่ต้องการใช้ โดยควรเลือกพื้นที่วางฐานข้อมูลให้อยู่ในพื้นที่เดียวกับพื้นที่ที่วาง mobile service ไว้ในขั้นตอนที่แล้ว เพื่อให้ไม่ต้องเสียค่าใช้จ่ายในการส่งข้อมูลระหว่างกัน

รอสักครู่ mobile service ที่สร้างไว้ก็จะพร้อมใช้งานแล้ว
การสร้างตารางข้อมูลสำหรับ mobile service
เพื่อให้ mobile service ที่เราสร้างขึ้นสามารถเก็บข้อมูลได้ เราจะต้องสร้างตารางข้อมูลขึ้นมา โดยเข้าไปยังหน้า mobile service ที่สร้างขึ้น เข้าไปที่แท็บ Data จากนั้นกดปุ่ม Create จะพบหน้าต่างให้กำหนดชื่อตารางและสิทธิ์ในการเข้าถึงข้อมูล ในที่นี้เราจะกำหนดชื่อตารางเป็น Document และให้สิทธิ์อ่าน/เขียน/แก้ไข/ลบข้อมูลทั้งหมดเป็น Anybody with the application key ก่อน

ตารางที่สร้างเริ่มต้นจะเป็นตารางแบบ Dynamic ซึ่งสามารถเพิ่มคอลัมน์ได้ทันทีเมื่อมีการสร้างข้อมูลด้วยคอลัมน์ที่ไม่มีอยู่แล้ว ณ ขณะนั้น ดังนั้นเราจึงไม่จำเป็นต้องกำหนด Schema ของฐานข้อมูลตอนนี้
เมื่อสร้างตารางเสร็จเรียบร้อย เพียงเท่านี้ส่วนเซิฟเวอร์ของเราก็พร้อมที่จะใช้งานแล้ว
การเตรียมโปรเจกต์เพื่อใช้งาน Windows Azure SDK
ถัดไปเราจะแก้ไขแอพลิเคชันของเราให้ใช้งาน SDK ของ Windows Azure ได้ โดยเริ่มต้นเราจะต้องดาวน์โหลดและติดตั้ง Windows Azure SDK เสียก่อน จากนั้นเปิดโปรเจกต์ที่ต้องการ คลิกขวาที่โปรเจกต์ใน Visual Studio ที่ต้องการใช้งาน แล้วเลือก Add Reference... จากนั้นทำเครื่องหมายหน้า Windows Azure Mobile Service JavaScript Client ซึ่งจะอยู่ในหมวด Windows > Extensions


จากนั้นให้เพิ่มโค้ด HTML ลงในส่วนหัวไฟล์ defaults.html เพื่อให้แอพลิเคชันเรียกสคริปต์ส่วนที่เป็น SDK มาใช้งาน ดังนี้
{syntaxhighlighter brush: xml highlight: [9]}
StrifePad
{/syntaxhighlighter}
ตอนนี้โปรเจกต์ของเราก็พร้อมที่จะเรียกใช้คำสั่งจาก Microsoft Azure SDK แล้ว
การสร้าง mobile service client
การเรียกใช้ mobile service นั้นจะต้องเรียกใช้ผ่านวัตถุ mobile service client เนื่องจากวัตถุดังกล่าวจะถูกใช้บ่อยครั้ง และมีการเก็บสถานะบางอย่าง (เช่น ผู้ใช้ปัจจุบัน ในกรณีที่แอพลิเคชันให้ผู้ใช้ยืนยันตัวตนได้ - ซึ่งจะกล่าวต่อไป) เราจะสร้างวัตถุนี้เพียงครั้งในเดียวในแอพลิเคชัน (และกำหนดให้โค้ดในแอพลิเคชันเรียกใช้วัตถุนี้ได้จาก StrifePad.azureClient) โดยแก้ไขไฟล์ js/default.js ดังนี้
{syntaxhighlighter brush: jscript highlight: [8,9,10,11,12,13,14]}
//
(function () {
"use strict";
WinJS.Binding.optimizeBindingReferences = true;
var app = WinJS.Application;
var activation = Windows.ApplicationModel.Activation;
var nav = WinJS.Navigation;
var azureClient = new Microsoft.WindowsAzure.MobileServices.MobileServiceClient(
"Application URL",
"Application key"
);
WinJS.Namespace.define("StrifePad", {
azureClient: azureClient
});
app.addEventListener("activated", function (args) {
if (args.detail.kind === activation.ActivationKind.launch) {
if (app.sessionState.history) {
nav.history = app.sessionState.history;
}
args.setPromise(WinJS.UI.processAll().then(function () {
if (nav.location) {
nav.history.current.initialPlaceholder = true;
return nav.navigate(nav.location, nav.state);
} else {
return nav.navigate(Application.navigator.home);
}
}));
}
});
app.addEventListener("checkpoint",function (args) {
app.sessionState.history = nav.history;
});
app.start();
})();
{/syntaxhighlighter}
อย่าลืมเปลี่ยน URL และ application key ให้ตรงกับ mobile service ของคุณ
สังเกตว่าเราได้เพิ่มคอมเมนต์ในบรรทัดแรก เพื่อช่วยให้ระบบ auto complete ของ Visual Studio อ่านข้อมูลจากไฟล์นั้นๆ มาแสดงให้เราเห็นด้วย
การสร้างข้อมูลลงใน mobile service
ตอนนี้เราก็มี StrifePad.azureClient ที่พร้อมจะถูกเรียกจากส่วนใดๆ ของแอพลิเคชันแล้ว เราจะเริ่มจากการแก้ไขหน้า editor ให้บันทึกข้อมูลลงบน mobile service
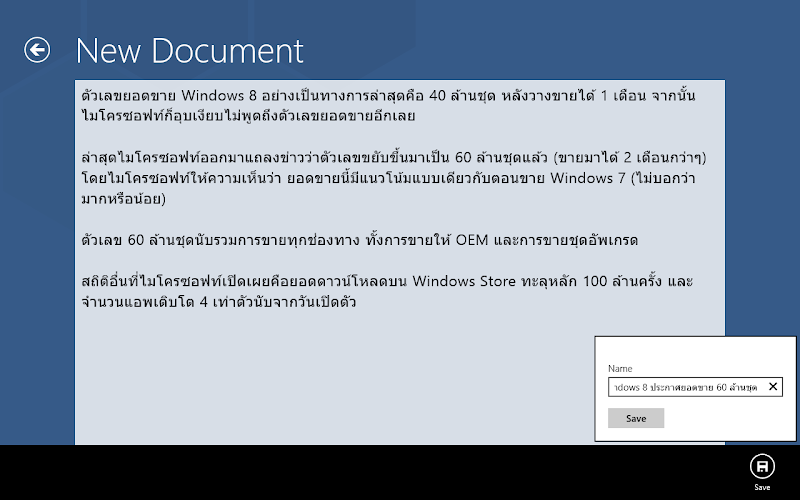
เริ่มต้นจากแก้ไขไฟล์ /pages/editor/editor.html เล็กน้อย โดยให้แสดง Flyout เมื่อผู้ใช้คลิกที่เมนู save เพื่อให้ผู้ใช้ระบุชื่อเอกสารก่อนบันทึก
{syntaxhighlighter brush: xml highlight: [22,23,24,25,26,27,28,29,30,31,32,33,34,35,36,37,38,39,40,41,42,43]}
editor
New Document
Name
Save
{/syntaxhighlighter}
จากนั้นแก้ไขไฟล์ /pages/editor/editor.js เพื่อสร้างข้อมูลจากชื่อและเนื้อหาที่ผู้ใช้กรอกไว้ โดยการสร้างนั้นสามารถทำได้อย่างง่ายดายโดยเรียกตารางที่ต้องการด้วยเมธอด getTable() จากนั้นเรียกเมธอด create() โดยส่งวัตถุที่ต้องการสร้างเข้าไป แต่ละ property ของวัตถุจะกลายเป็นหนึ่งคอลัมน์ในฐานข้อมูล
{syntaxhighlighter brush: jscript highlight: [7,8,9,18,19,20,21,22,23,24,25,26,27,33,34,35,43]}
//
(function () {
"use strict";
var pageTitle;
var contentArea;
var bottomAppBar;
var saveFlyout;
var saveFlyoutNameField;
var saveFlyoutSubmitButton;
var onCheckpoint = function () {
WinJS.Application.sessionState.editorState = {
pageTitle: pageTitle.innerText,
innerText: contentArea.innerText,
selectionStart: contentArea.selectionStart,
selectionEnd: contentArea.selectionEnd
}
};
var onSubmitSaveFlyout = function () {
bottomAppBar.winControl.hide();
saveFlyout.winControl.hide();
StrifePad.azureClient.getTable("Document").insert({
name: saveFlyoutNameField.value,
content: contentArea.innerText
}).done(function () {
pageTitle.innerText = saveFlyoutNameField.value;
});
};
WinJS.UI.Pages.define("/pages/editor/editor.html", {
ready: function (element, options) {
pageTitle = element.querySelector("#pageTitle");
contentArea = element.querySelector("#contentArea");
bottomAppBar = element.querySelector("#bottomAppBar");
saveFlyout = element.querySelector("#saveFlyout");
saveFlyoutNameField = element.querySelector("#saveFlyoutNameField");
saveFlyoutSubmitButton = element.querySelector("#saveFlyoutSubmitButton");
if (WinJS.Application.sessionState.editorState) {
var editorState = WinJS.Application.sessionState.editorState;
pageTitle.innerText = editorState.pageTitle;
contentArea.innerText = editorState.innerText;
contentArea.setSelectionRange(editorState.selectionStart, editorState.selectionEnd);
delete WinJS.Application.sessionState.editorState;
}
saveFlyoutSubmitButton.addEventListener("click", onSubmitSaveFlyout);
WinJS.Application.addEventListener("checkpoint", onCheckpoint);
}
});
})();
{/syntaxhighlighter}
เพียงเท่านี้ก็เสร็จเรียบร้อยแล้ว ทดลองรันแอพลิเคชันและสร้างเอกสาร จากนั้นกลับมาดูที่แท็บ browse ในหน้าตารางที่สร้างไว้ จะพบว่ามีข้อมูลที่สร้างขึ้นปรากฎในฐานข้อมูล

การอ่านข้อมูลจาก mobile service
เมื่อเขียนข้อมูลเสร็จเรียบร้อยแล้ว คราวนี้เราจะอ่านข้อมูลที่เขียนไปมาแสดงเป็นรายการเอกสารในหน้าแรกของแอพลิเคชันกัน โดยแก้ไขหน้า home ดังนี้
แก้ไขไฟล์ /pages/home/home.js ให้เรียกฟังก์ชัน read() เพื่ออ่านข้อมูลจากตาราง
{syntaxhighlighter brush: jscript highlight: [14,15,16,17,18,19]}
//
(function () {
"use strict";
var newButton;
var documentsListView;
var onNewDocument = function (event) {
WinJS.Navigation.navigate("/pages/editor/editor.html");
};
WinJS.UI.Pages.define("/pages/home/home.html", {
ready: function (element, options) {
newButton = element.querySelector("#newButton");
documentsListView = element.querySelector("#documentsListView");
newButton.addEventListener("click", onNewDocument);
StrifePad.azureClient.getTable("Document")
.read()
.done(function (results) {
var documents = new WinJS.Binding.List(results);
documentsListView.winControl.itemDataSource = documents.dataSource;
});
}
});
})();
{/syntaxhighlighter}
ส่วน /pages/home/home.html แก้ไขเล็กน้อยเพื่อให้แต่ละชิ้นของลิสต์นำคอลัมน์ name ของฐานข้อมูลมาแสดงผล
{syntaxhighlighter class="brush: xml highlight: [14,15,16,31,32,33,34,35,36]"}
homePage
StrifePad
New
Cloud Storage
{/syntaxhighlighter}
ลองรันแอพลิเคชันทดสอบอีกครั้ง จะพบลิสต์ของเอกสารทั้งหมดที่ได้สร้างไว้ (ค่าตั้งต้นของฟังก์ชัน read จะจำกัดจำนวนข้อมูลที่อ่านได้ที่ 50 แถวล่าสุด)

อย่างไรก็ตาม การเขียนโค้ดลักษณะนี้จะเกิดข้อผิดพลาดได้ หากผู้ใช้ข้ามไปยังหน้าอื่น (เช่น กดปุ่ม New) ก่อนที่การโหลดข้อมูลจะเสร็จสิ้น เนื่องจากฟังก์ชันที่ทำงานหลังจากโหลดข้อมูลเสร็จสิ้นไม่สามารถทำงานได้อย่างถูกต้อง ดังนั้นเราควรจะยกเลิกการโหลดข้อมูลหากผู้ใช้ข้ามไปยังหน้าอื่น โดยปรับปรุงโค้ดใหม่ ดังนี้
{syntaxhighlighter brush: jscript highlight: [6,16,21,25,26,27,28,29,30]}
//
(function () {
"use strict";
var newButton;
var documentsListView;
var loadingDocumentsPromise;
var onNewDocument = function (event) {
WinJS.Navigation.navigate("/pages/editor/editor.html");
};
WinJS.UI.Pages.define("/pages/home/home.html", {
ready: function (element, options) {
newButton = element.querySelector("#newButton");
documentsListView = element.querySelector("#documentsListView");
newButton.addEventListener("click", onNewDocument);
if (StrifePad.azureClient.currentUser) {
loadingDocumentsPromise = StrifePad.azureClient.getTable("Document")
.read()
.done(function (result) {
var documents = new WinJS.Binding.List(result);
documentsListView.winControl.itemDataSource = documents.dataSource;
loadingDocumentsPromise = null;
});
}
},
unload: function () {
if (loadingDocumentsPromise) {
loadingDocumentsPromise.cancel();
loadingDocumentsPromise = null;
}
}
});
})();
{/syntaxhighlighter}
โค้ดส่วนที่เพิ่มขึ้นมาจะเก็บวัตถุ Promise ของการโหลดข้อมูลไว้เพื่อยกเลิกหากมีการออกจากหน้าดังกล่าว (ซึ่งสามารถกำหนดการทำงานได้ในฟังก์ชัน unload ของหน้านั้นๆ)
การรองรับการเปิดแอพลิเคชันผ่าน URI Protocol
ตอนนี้แอพลิเคชันของเราสามารถสร้างเอกสาร และแสดงรายการเอกสารที่มีได้แล้ว แต่ยังไม่สามารถเปิดเอกสารขึ้นมาอ่านได้ ตอนนี้เราจะทำให้แอพลิเคชันของเราสามารถเปิดอ่านได้ผ่าน URI ในรูปแบบ strifepad://document/1 (1 คือ id ของเอกสาร) เพื่อให้สามารถแชร์ URI นี้ไปให้ผู้อื่นอ่านได้ สามารถทำได้ดังนี้
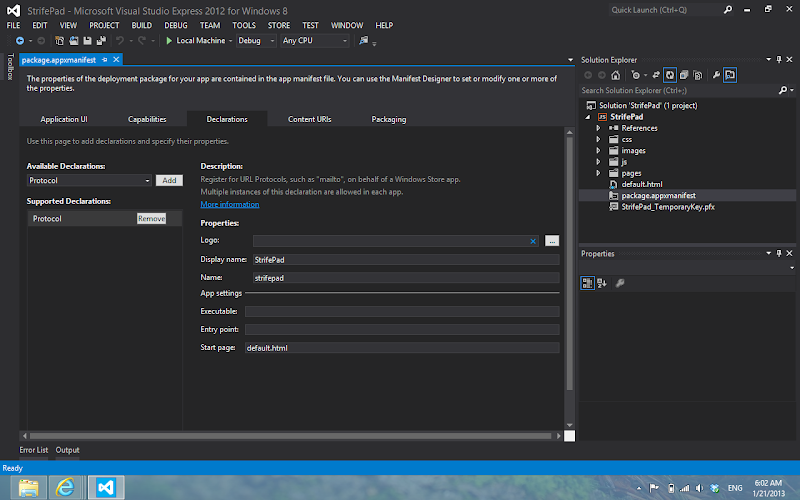
เริ่มต้นจากเปิดไฟล์ package.appxmanifest ไปยังแท็บ Declarations แล้วเพิ่ม Protocal Declaration เพื่อให้แอพลิเคชันของเราถูกเรียกเมื่อมีการเปิด URI ที่ขึ้นต้นด้วยโปรโตคอลที่เรากำหนด โดยกำหนดชื่อโปรโตคอลที่ช่อง name ซึ่งต้องเป็นอักษรพิมพ์ภาษาอังกฤษตัวพิมพ์เล็กหรือตัวเลขเท่านั้น (ในที่นี้กำหนดเป็น strifepad)
ถึงตอนนี้เราสามารถทดลองกรอก URI ว่า strifepad://hello ใน Internet Explorer แอพลิเคชันของเราจะถูกเปิดขึ้นมาแล้ว คราวนี้เราจะอ่าน URI ที่ถูกเรียกขึ้นมาเพื่อเปิดหน้า editor โดยแก้ไขไฟล์ /js/default.js ดังนี้
{syntaxhighlighter brush: jscript highlight: [31,32,33,34,35,36,37,38,39,40,41,42,43,44]}
//
(function () {
"use strict";
WinJS.Binding.optimizeBindingReferences = true;
var app = WinJS.Application;
var activation = Windows.ApplicationModel.Activation;
var nav = WinJS.Navigation;
var azureClient = new Microsoft.WindowsAzure.MobileServices.MobileServiceClient(
"https://strifepad.azure-mobile.net/",
"vxhSfbaGkOASriBUGeXZJtMPregQGy91"
);
WinJS.Namespace.define("StrifePad", {
azureClient: azureClient
});
app.addEventListener("activated", function (args) {
if (args.detail.kind === activation.ActivationKind.launch) {
if (app.sessionState.history) {
nav.history = app.sessionState.history;
}
args.setPromise(WinJS.UI.processAll()
.then(function () {
if (nav.location) {
nav.history.current.initialPlaceholder = true;
return nav.navigate(nav.location, nav.state);
} else {
return nav.navigate(Application.navigator.home);
}
})
);
}
else if (args.detail.kind === Windows.ApplicationModel.Activation.ActivationKind.protocol) {
args.setPromise(WinJS.UI.processAll()
.then(function () {
if (args.detail.uri.host == "document") {
return nav.navigate("/pages/editor/editor.html", {
uri: args.detail.uri
});
}
else {
return nav.navigate(Application.navigator.home);
}
})
);
}
});
app.addEventListener("checkpoint", function (args) {
app.sessionState.history = nav.history;
});
app.start();
})();
{/syntaxhighlighter}
โค้ดส่วนที่เพิ่มเติมนี้จะตรวจสอบว่า ในกรณีที่แอพลิเคชันถูกเรียกผ่าน URI ให้ตรวจสอบว่า URI ที่ได้ตรงกับรูปแบบที่ต้องการหรือไม่ (strifepad://document/...) หากตรงให้เปิดหน้า editor ขึ้นมา โดยส่ง URI นั้นให้กับ editor ด้วย แต่ถ้าไม่ตรงให้เปิดหน้าหลัก
จากนั้นแก้ไขไฟล์ /pages/editor/editor.js เพื่อนำ URI ที่ได้ไปหา ID และโหลดข้อมูลจาก mobile service มาใช้ ดังนี้
{syntaxhighlighter brush: jscript highlight: [43,44,45,46,47,48,49,50,51,52,53,54,55,56,57,58]}
//
(function () {
"use strict";
var pageTitle;
var contentArea;
var bottomAppBar;
var saveFlyout;
var saveFlyoutNameField;
var saveFlyoutSubmitButton;
var onCheckpoint = function () {
WinJS.Application.sessionState.editorState = {
pageTitle: pageTitle.innerText,
innerText: contentArea.innerText,
selectionStart: contentArea.selectionStart,
selectionEnd: contentArea.selectionEnd
}
};
var onSubmitSaveFlyout = function () {
bottomAppBar.winControl.hide();
saveFlyout.winControl.hide();
StrifePad.azureClient.getTable("Document").insert({
name: saveFlyoutNameField.value,
content: contentArea.innerText
}).done(function (result) {
pageTitle.innerText = saveFlyoutNameField.value;
});
};
WinJS.UI.Pages.define("/pages/editor/editor.html", {
ready: function (element, options) {
pageTitle = element.querySelector("#pageTitle");
contentArea = element.querySelector("#contentArea");
bottomAppBar = element.querySelector("#bottomAppBar");
saveFlyout = element.querySelector("#saveFlyout");
saveFlyoutNameField = element.querySelector("#saveFlyoutNameField");
saveFlyoutSubmitButton = element.querySelector("#saveFlyoutSubmitButton");
if (WinJS.Application.sessionState.editorState) {
var editorState = WinJS.Application.sessionState.editorState;
pageTitle.innerText = editorState.pageTitle;
contentArea.innerText = editorState.innerText;
contentArea.setSelectionRange(editorState.selectionStart, editorState.selectionEnd);
delete WinJS.Application.sessionState.editorState;
}
else if (options && options.uri) {
var documentId = options.uri.path.substring(1);
StrifePad.azureClient.getTable("Document")
.where({
id: documentId
})
.take(1)
.read()
.then(function (result) {
if (result.length > 0) {
currentDocumentId = result[0].id;
pageTitle.innerText = result[0].name;
contentArea.innerText = result[0].content;
}
});
}
saveFlyoutSubmitButton.addEventListener("click", onSubmitSaveFlyout);
WinJS.Application.addEventListener("checkpoint", onCheckpoint);
}
});
})();
{/syntaxhighlighter}
สำหรับโค้ดในการอ่านข้อมูลนั้นไม่ต่างจากการอ่านข้อมูลในหน้าหลัก แต่เพิ่มเมธอด take(1) เพื่อกำหนดให้อ่านข้อมูลจากฐานข้อมูลมาเพียงแถวเดียวเท่านั้น
สุดท้ายเราจะปรับปรุงหน้าหลักให้ส่ง URI ในลักษณะเดียวกันมาที่ editor ด้วย โดยแก้ไขโค้ดในไฟล์ /pages/home/home.js ดังนี้
{syntaxhighlighter brush: jscript highlight: [22,23,24,30,31,32,33,34,35,36,37]}
//
(function () {
"use strict";
var newButton;
var documentsListView;
var loadingDocumentsPromise;
var onNewDocument = function (event) {
WinJS.Navigation.navigate("/pages/editor/editor.html");
};
WinJS.UI.Pages.define("/pages/home/home.html", {
ready: function (element, options) {
newButton = element.querySelector("#newButton");
documentsListView = element.querySelector("#documentsListView");
newButton.addEventListener("click", onNewDocument);
if (StrifePad.azureClient.currentUser) {
loadingDocumentsPromise = StrifePad.azureClient.getTable("Document")
.where({
ownerUserId: StrifePad.azureClient.currentUser.userId
})
.read()
.then(function (result) {
for (var i = 0; i < result.length; i++) {
result[i].uri = new Windows.Foundation.Uri("strifepad://document/" + result[i].id);
}
var documents = new WinJS.Binding.List(result);
documentsListView.winControl.itemDataSource = documents.dataSource;
loadingDocumentsPromise = null;
});
}
documentsListView.addEventListener("iteminvoked", function (e) {
e.detail.itemPromise
.then(function (item) {
WinJS.Navigation.navigate("/pages/editor/editor.html", {
uri: item.data.uri
})
});
});
},
unload: function () {
if (loadingDocumentsPromise) {
loadingDocumentsPromise.cancel();
loadingDocumentsPromise = null;
}
}
});
})();
{/syntaxhighlighter}
ถึงตอนนี้แอพลิเคชันของเราจะสามารถเปิดอ่านเอกสารได้ทั้งสองวิธี คือคลิกผ่านลิสต์ในหน้าหลัก หรือเข้าถึงผ่าน URI strifepad://document/[id] เราสามารถเพิ่มความสามารถในการแชร์ URI ดังกล่าวจากหน้า editor ได้โดยใช้ปุ่ม Share ใน Charm Bar เพื่อให้ผู้ใช้สามารถแชร์เอกสารให้ผู้อื่นได้สะดวกยิ่งขึ้น โดยวิธีการทำนั้นสามารถอ่านได้จากบทความตอนก่อนหน้านี้
การคัดกรอง/เพิ่มเติมข้อมูลที่จะถูกสร้างใน mobile service
ในบางครั้งเราต้องการตรวจสอบข้อมูลที่ส่งเข้ามาก่อนที่จะสร้าง หรือต้องการเพิ่มข้อมูลบางอย่างที่ฝั่งเซิฟเวอร์ เช่น วันที่สร้างข้อมูลนั้น เราสามารถทำได้โดยแก้ไขสคริปท์ของตารางนั้น โดยเข้าไปที่หน้าตารางที่ต้องการ จากนั้น
คลิกที่แท็บ script จะมีสคริปท์ที่จะถูกเรียกเมื่อมีการเรียก read/insert/update/delete ข้อมูล ให้เราแก้ไขได้
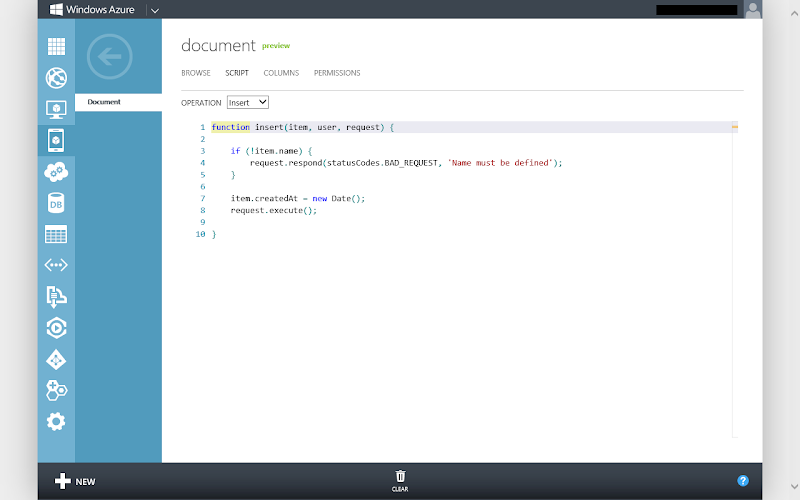
ในการแก้ไขสคริปท์สำหรับ insert เราสามารถตรวจสอบหรือเพิ่มเติมข้อมูลจากวัตถุ item ได้ ก่อนจะเรียกฟังก์ชัน request.execute(); เพื่อสร้างข้อมูลนั้นในฐานข้อมูลจริงๆ หรือจะคืนข้อผิดพลาดกลับไปโดยใช้เมธอด request.response(); ก็ได้
ตัวอย่างเช่น หากเราต้องการแสดงข้อผิดพลาดหากข้อมูลที่สร้างมาไม่มีชื่อ และใส่ timestamp เวลาที่สร้างข้อมูลนั้นด้วย เราจะแก้สคริปท์ดังกล่าวได้เป็นดังนี้
{syntaxhighlighter brush: jscript highlight: [5]}
function insert(item, user, request) {
if (!item.name) {
request.respond(statusCodes.BAD_REQUEST, 'Name must be defined');
}
item.createdAt = new Date();
request.execute();
}
{/syntaxhighlighter}
ลองสร้างเอกสารใหม่จากฝั่งไคล์เอนต์อีกครั้งหนึ่ง ครั้่งนี้จะพบว่ามีฟิลด์ createdAt เพิ่มขึ้นมาแล้ว พร้อมกับเวลาที่สร้างเอกสารนั้น

การยืนยันตัวตนผู้ใช้ด้วย Microsoft Account
ตอนนี้แอพลิเคชันของเราสามารถสร้างและอ่านเอกสารได้แล้ว แต่เราไม่สามารถแยกได้ว่าเอกสารที่สร้างนั้นเป็นของใครบ้าง เนื่องจากทุกคนสามารถสร้างเอกสารได้โดยไม่ต้องยืนยันตัวตนใดๆ เราจะเพิ่มความสามารถในการยืนยันตัวตนขึ้นเพื่อให้เราทราบว่าเอกสารที่สร้างขึ้นเป็นของใครบ้าง
สำหรับการยืนยันตัวตนบน mobile service นั้นเราสามารถใช้แอคเคานท์ของบริการหลักๆ อย่าง Microsoft Account, Facebook, Twitter, Google Account ในการยืนยันตัวตนได้เลย ตัวอย่างนี้จะยกตัวอย่างการยืนยันตัวตนด้วย Microsoft Account ซึ่งทำได้ดังนี้ (สำหรับบัญชีประเภทอื่นๆ ดูวิธีการได้จากเอกสารแนะนำของ Microsoft Azure)
เริ่มจากไปคลิกปุ่ม manage keys ที่ส่วนหน้าของหน้าจัดการทรัพยากร Windows Azure จากนั้นคัดลอกคีย์ไว้

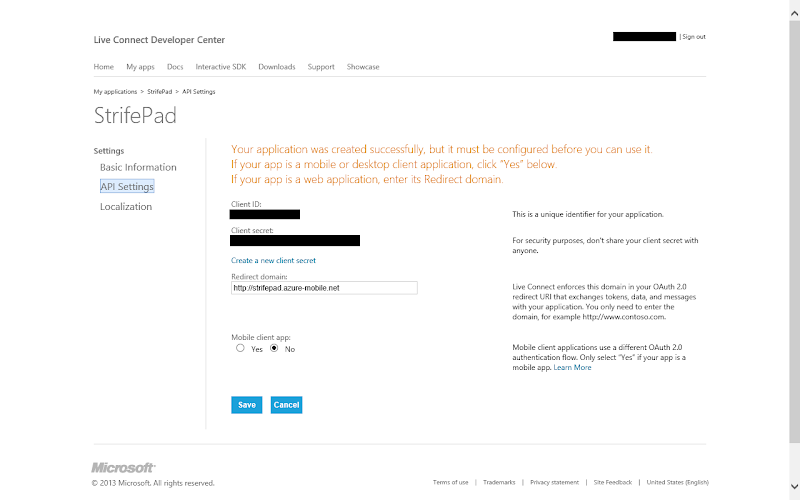
จากนั้นให้เราสร้างแอพลิเคชันสำหรับเชื่อมต่อกับ Microsoft Account โดยเข้าไปที่หน้าจัดการแอพลิเคชันของ Live Connect Developer Center แล้วสร้างแอพลิเคชันใหม่

จากนั้นให้กำหนด redirect domain กลับไปยังที่อยู่ของ mobile service ที่เราสร้างไว้ (ในที่นี้คือ http://strifepad.azure-mobile.net)
จากนั้นแล้วนำ client ID และ client secret ที่ได้กลับมาตั้งค่าให้กับ mobile service ในหน้า identity เป็นอันเสร็จการเชื่อมต่อระหว่าง mobile service กับระบบยืนยันตัวตนของ Microsoft Account

เสร็จสิ้นการตั้งค่าที่ฝั่งเซิฟเวอร์ จากนั้นเราจะทำให้แอพลิเคชันของเราแสดงหน้าล็อกอินก่อนเริ่มแอพลิเคชัน โดยแก้ไข default.js ดังนี้
{syntaxhighlighter brush: jscript highlight: [47,48,49,50,51,52,53,54,55,56,57,58,59,60,61,62,63,64,66,67,68,69,71]}
//
(function () {
"use strict";
WinJS.Binding.optimizeBindingReferences = true;
var app = WinJS.Application;
var activation = Windows.ApplicationModel.Activation;
var nav = WinJS.Navigation;
var passwordVault = new Windows.Security.Credentials.PasswordVault();
var azureClient = new Microsoft.WindowsAzure.MobileServices.MobileServiceClient(
"https://strifepad.azure-mobile.net/",
"vxhSfbaGkOASriBUGeXZJtMPregQGy91"
);
WinJS.Namespace.define("StrifePad", {
azureClient: azureClient
});
var startApp = function (args) {
if (args.detail.kind === activation.ActivationKind.launch) {
if (app.sessionState.history) {
nav.history = app.sessionState.history;
}
args.setPromise(WinJS.UI.processAll()
.then(function () {
if (nav.location) {
nav.history.current.initialPlaceholder = true;
return nav.navigate(nav.location, nav.state);
} else {
return nav.navigate(Application.navigator.home);
}
})
);
}
else if (args.detail.kind === Windows.ApplicationModel.Activation.ActivationKind.protocol) {
args.setPromise(WinJS.UI.processAll()
.then(function () {
if (args.detail.uri.host == "document") {
return nav.navigate("/pages/editor/editor.html", {
uri: args.detail.uri
});
}
else {
return nav.navigate(Application.navigator.home);
}
})
);
}
}
var ensureLoggedInBeforeStartApp = function (args) {
StrifePad.azureClient.login("microsoftaccount")
.then(function (results) {
var credential = new Windows.Security.Credentials.PasswordCredential(
"azureClient",
results.userId,
results.mobileServiceAuthenticationToken);
passwordVault.add(credential);
            // Logging in to Azure mobile service completed.
            // We'll continue the normal process to let the application starts.
            startApp(args);
        }, function () {
            // Logging in to Azure mobile service failed. Try again.
            var tryAgainMessage = new Windows.UI.Popups.MessageDialog(
                "Sorry. You have to login to use the application",
                "Login required"
            );
            return tryAgainMessage.showAsync()
                .then(function () {
                    return ensureLoggedInBeforeStartApp(args);
                });
        });
};
app.addEventListener("activated", function (args) {
    ensureLoggedInBeforeStartApp(args);
});
app.addEventListener("checkpoint",function (args) {
    app.sessionState.history = nav.history;
});
app.start();
})();
{/syntaxhighlighter}
เราเปลี่ยนพฤติกรรมของแอพลิเคชันเมื่อแอพลิเคชันเริ่ม activated ใหม่ให้ไปเรียกฟังก์ชัน ensureLoggedInBeforeStartApp ที่เราสร้างขึ้นแทน โดยฟังก์ชันนี้บังคับให้ล็อกอินก่อนโดยใช้ฟังก์ชัน login ของ mobile service client เมื่อล็อกอินเสร็จแล้วเราจึงจะปล่อยให้แอพลิเคชันเริ่มตามปกติด้วยฟังก์ชัน startApp (ซึ่งโค้ดฟังก์ชันนี้คัดลอกมาจากพฤติกรรมเดิมเมื่อแอพลิเคชันเริ่ม activated) แต่หากล็อกอินไม่สำเร็จให้แสดงข้อความเตือนและวนมาเรียกฟังก์ชันนี้ซ้ำอีกครั้งหนึ่งเพื่อบังคับให้ล็อกอินใหม่
ทดสอบโดยรันแอพลิเคชันดูอีกครั้ง จะพบว่าผู้ใช้จะไม่สามารถผ่านไปถึงหน้าแรกได้จนกว่าจะล็อกอินให้เรียบร้อยเสียก่อน


จากนั้นเราจะกลับไปแก้ไขสคริปท์ในการ insert ข้อมูลใหม่ โดยให้บันทึก userId ของผู้สร้างเอกสารลงไปด้วย ดังนี้
{syntaxhighlighter brush: jscript highlight: [2,3,4,5]}
function insert(item, user, request) {
if (!item.name) {
request.respond(statusCodes.BAD_REQUEST, 'Name must be defined');
}
item.ownerUserId = user.userId;
item.createdAt = new Date();
request.execute();
}
{/syntaxhighlighter}
ทดลองสร้างเอกสารใหม่อีกครั้ง จะมีคอลัมน์ ownerUserId เพิ่มขึ้นมา และมี userId ของผู้สร้างเอกสารนั้นเก็บไว้ในฐานข้อมูลแล้ว

จากนั้นแก้ไขวิธีการคิวรีในไฟล์ /pages/home/home.js ใหม่ ให้คิวรีเฉพาะเอกสารที่สร้างโดยผู้ที่ล็อกอินอยู่เท่านั้น โดยใช้ฟังก์ชัน where ดังนี้ (สำหรับฟังก์ชันสำหรับคิวรีอื่นๆ สามารถดูได้จากเอกสารคลาส MobileServiceTable)
{syntaxhighlighter brush: jscript highlight: [17,18,19]}
//
(function () {
"use strict";
var newButton;
var documentsListView;
var loadingDocumentsPromise;
var onNewDocument = function (event) {
WinJS.Navigation.navigate("/pages/editor/editor.html");
};
WinJS.UI.Pages.define("/pages/home/home.html", {
ready: function (element, options) {
newButton = element.querySelector("#newButton");
documentsListView = element.querySelector("#documentsListView");
newButton.addEventListener("click", onNewDocument);
if (StrifePad.azureClient.currentUser) {
loadingDocumentsPromise = StrifePad.azureClient.getTable("Document")
.where({
ownerUserId: StrifePad.azureClient.currentUser.userId
})
.read()
.done(function (result) {
for (var i = 0; i < result.length; i++) {
result[i].uri = new Windows.Foundation.Uri("strifepad://document/" + result[i].id);
}
var documents = new WinJS.Binding.List(result);
documentsListView.winControl.itemDataSource = documents.dataSource;
loadingDocumentsPromise = null;
});
}
documentsListView.addEventListener("iteminvoked", function (e) {
e.detail.itemPromise
.then(function (item) {
WinJS.Navigation.navigate("/pages/editor/editor.html", {
uri: item.data.uri
})
});
});
},
unload: function () {
if (loadingDocumentsPromise) {
loadingDocumentsPromise.cancel();
loadingDocumentsPromise = null;
}
}
});
})();
{/syntaxhighlighter}
เมื่อทดสอบดูจะพบว่าเราจะคิวรีได้เฉพาะเอกสารที่สร้างโดยผู้ที่ล็อกอินอยู่แล้ว

เพื่อประสิทธิภาพที่ดีขึ้นในการคิวรีเอกสารจากไอดีของผู้ใช้ ซึ่งเกิดขึ้นได้บ่อยครั้ง เราสามารถกำหนดให้ฐานข้อมูลทำ index ให้กับคอลัมน์นี้ได้ โดยเข้าไปที่หน้า columns ของตาราง เลือกคอลัมน์ที่ต้องการ แล้วกดปุ่ม set index

การจำสถานะการยืนยันตัวตน
ผู้ใช้คงไม่สนุกนักหากต้องเข้าสู่ระบบทุกๆ ครั้งที่เปิดแอพลิเคชัน ดังนั้นเราจะจำข้อมูลผู้ใช้ไว้เพื่อโหลดกลับมาใช้ต่อในรอบถัดไป โดยไม่ต้องให้ผู้ใช้ล็อกอินซ้ำ โดยแก้ไขไฟล์ /js/default.js ดังนี้
{syntaxhighlighter brush: jscript highlight: [48,49,50,51,52,53,54,55,56,59,60,61,62,63,78]}
//
(function () {
"use strict";
WinJS.Binding.optimizeBindingReferences = true;
var app = WinJS.Application;
var activation = Windows.ApplicationModel.Activation;
var nav = WinJS.Navigation;
var passwordVault = new Windows.Security.Credentials.PasswordVault();
var azureClient = new Microsoft.WindowsAzure.MobileServices.MobileServiceClient(
"https://strifepad.azure-mobile.net/",
"vxhSfbaGkOASriBUGeXZJtMPregQGy91"
);
WinJS.Namespace.define("StrifePad", {
azureClient: azureClient
});
var startApp = function (args) {
if (args.detail.kind === activation.ActivationKind.launch) {
if (app.sessionState.history) {
nav.history = app.sessionState.history;
}
args.setPromise(WinJS.UI.processAll()
.then(function () {
if (nav.location) {
nav.history.current.initialPlaceholder = true;
return nav.navigate(nav.location, nav.state);
} else {
return nav.navigate(Application.navigator.home);
}
})
);
}
else if (args.detail.kind === Windows.ApplicationModel.Activation.ActivationKind.protocol) {
args.setPromise(WinJS.UI.processAll()
.then(function () {
if (args.detail.uri.host == "document") {
return nav.navigate("/pages/editor/editor.html", {
uri: args.detail.uri
});
}
else {
return nav.navigate(Application.navigator.home);
}
})
);
}
}
var ensureLoggedInBeforeStartApp = function (args) {
try {
var credentials = passwordVault.findAllByResource("azureClient");
credentials[0].retrievePassword();
StrifePad.azureClient.currentUser = {
userId: credentials[0].userName,
mobileServiceAuthenticationToken: credentials[0].password
};
startApp(args);
} catch (e) {
StrifePad.azureClient.login("microsoftaccount")
.then(function (results) {
var credential = new Windows.Security.Credentials.PasswordCredential(
"azureClient",
results.userId,
results.mobileServiceAuthenticationToken);
passwordVault.add(credential);
// Logging in to Azure mobile service completed.
// We'll continue the normal process to let the application starts.
startApp(args);
}, function () {
// Logging in to Azure mobile service failed. Try again.
var tryAgainMessage = new Windows.UI.Popups.MessageDialog(
"Sorry. You have to login to use the application",
"Login required"
);
return tryAgainMessage.showAsync()
.then(function () {
return ensureLoggedInBeforeStartApp(args);
});
});
}
};
app.addEventListener("activated", function (args) {
ensureLoggedInBeforeStartApp(args);
});
app.addEventListener("checkpoint",function (args) {
app.sessionState.history = nav.history;
});
app.start();
})();
{/syntaxhighlighter}
โค้ดส่วนที่เพิ่มเติมจะเก็บข้อมูลของผู้ใช้ไว้เมื่อล็อกอินสำเร็จ แต่เนื่องจากข้อมูลผู้ใช้นั้นประกอบด้วย ID และ token สำหรับการยืนยันตัวตน ดังนั้นเราจึงเก็บข้อมูลนี้ไว้ใน PasswordVault เพื่อความปลอดภัย และตรวจสอบว่าหากมีข้อมูลผู้ใช้เก็บไว้อยู่แล้ว ให้นำค่านั้นมากำหนดให้กับ mobile service client เพื่อให้ใช้งานต่อได้ทันทีโดยไม่ต้องล็อกอิน
บทสรุป
ในตอนนี้เราได้พัฒนาแอพลิเคชันเพื่อติดต่อกับ Microsoft Azure Mobile Service ซึ่งสามารถสร้างบริการฝั่งเซิฟเวอร์ได้อย่างรวดเร็ว อย่างไรก็ตามโค้ดในส่วนไคลเอนต์นั้นยังมีอีกหลายพฤติกรรมที่ผู้เขียนไม่ได้เขียนไว้ เช่น การแก้ไขข้อมูล การแสดงสถานะการโหลดข้อมูล การรองรับข้อผิดพลาดต่างๆ เพื่อไม่ให้บทความยาวจนเกินไป โดยส่วนนี้ฝากไว้ให้ผู้อ่านไปทดลองทำเพิ่มเติมด้วยตนเอง
สารบัญบทความ
บทความชุด การเขียนแอพลิเคชันสำหรับ Windows 8 App Store


จริง ๆ
hisoft Mon, 21/01/2013 - 22:40
จริง ๆ ผมอยากให้เน้นเนื้อโค้ดที่เปลี่ยนเวลาที่มี
เสียหน่อยนะครับ
ใช้เบราวเซอร์อะไรอะครับ
champjss Mon, 21/01/2013 - 22:46
In reply to จริง ๆ by hisoft
ใช้เบราวเซอร์อะไรอะครับ ผมเห็นไฮไลต์หมดนะ ยกเว้น IE9 ลงไป
IE10 ครับ ตอนนี้เห็นแล้ว - -"
hisoft Mon, 21/01/2013 - 23:46
In reply to ใช้เบราวเซอร์อะไรอะครับ by champjss
IE10 ครับ ตอนนี้เห็นแล้ว - -" รอบแรกมาเป็น Text ธรรมดาเลย ไม่มีเลขบรรทัด ไม่มีพื้นหลัง ไม่มีอะไรทั้งนั้น เป็น Text ล้วน ๆ สงสัยมันโหลดไม่หมดครับเพราะรูปก็ไม่ขึ้นเพียบเลย สงสัยเน็ตจะน็อกกลางทาง เมนท์แล้วผมก็ไม่ได้กลับขึ้นไปดูด้วย ขอโทษทีครับ (/|)
Chrome เห็นนะครับ
Metro Thu, 24/01/2013 - 09:27
In reply to จริง ๆ by hisoft
Chrome เห็นนะครับ
เป็นบทความที่ดีครับเหมาะกับกา
TheOne Wed, 23/01/2013 - 13:13
เป็นบทความที่ดีครับเหมาะกับการเริ่มต้น สามารถทำตามได้เลย ผมตามอ่านถึงตอนที่ 3 อยู่เลยครับ ถ้าเป็นไปได้ช่วยแปะ link ไปยังบทความก่อนหน้าด้วยได้ไหมครับ
อยากเห็น blognone บน windows
iPongHD Sun, 27/01/2013 - 02:29
อยากเห็น blognone บน windows 8 , rt จังเลย